Published
Hi this is Carl the landscape guy. Today I want to build a large floating net basket, which is going be used in a natural pond. Therein, larger fish can temporarily be held in quarantine or it can be used for raising young fish. There are different floating nets available but they are pretty expensive and they don't really fit my needs exactly. I will now show the construction step by step and i will explain what i do. At the end I will test the new floating net basket in a natural pond.
First I am planning exactly how big the keep net will be and make a drawing. It is going to be 2.2 meters long, 1.2 meters wide and 0,8 meters deep. The drawing can now be used to . This drawing shows the net spread, it going to be made in one piece, that way I save some seams. I decided to use weatherproof fishnet mesh type PES300 with 3mm mesh width and ordered 10m² at netzeallerart.de
I designed the net the way that it can be sewn together in cuboid shape. It is easier to cut the mesh on level ground using the straight joints from the terrace for example. That way i get the rectangular angles easier. With tape measure, ruler and marker pen, the cuts are now transferred from the paper drawing onto the mesh. Since the mesh is to be cut the same way on both ends I fold it once, in order to be able to cut both ends simultaneously. Slipping can be prevented by fixation with needles. Then the slices are easily carried out with sharp scissors.
Now the net is sewn together according to the drawing to a cuboid.
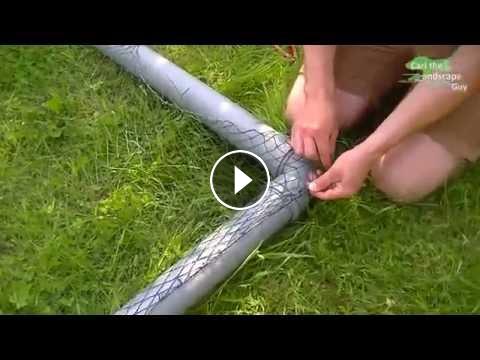
The keep net will float on the water through pipes later. Therefore the net is flipped on the edges and sewn as a wide seam, so the float tube can later be simply inserted into the so formed tunnel. It is left open at one spot so that the pipe can be inserted.
As floating tubes I use PVC pipes 7,5 cm in diameter. These are stable, have an inconspicuous color, rubber seals on the connections and I can take it apart at any time again. I use 2m pieces for the long sides and 1m pieces for the short sides. Each corner is built from two 45° pipe elbows. I bought all pipes at the hardware store. All seals are treated with lubricant that way they can be pushed in easier and seal off better. The floating tube ring is left open at one point, so that I can slide on the sewn net. It works best to have someone helping to hold the pipes while you slide it on. Now it looks quite like a fish keep net already.
But I will add a removable cover net. This should keep the fish safe from predators like herons and cormorants and keep the fish from jumping out. To secure the net screws are placed in the pipes. The screws can be set at the crossing points, which gives additional stability. In between more screws are set centrally. Now the net can easily be put on. It is a stable Bird netting that is stretched with a threaded string.
I want to put some weight in the inside of the floating net basket to keep it hanging down. Therefore I got some thin cable pipes and elbows. I stuff some metal wire into the small pipes to make them heavy and cut them to the right length. Now I am gluing the pipes together with the elbows to a frame that fits the size of the net basket. I drill small holes into the pipes for the air to come out under water. Allow the glue to dry and done.
Now the fish keeping net can be set into the water. It now consists of three parts, the net with float tubes, the cover and the weighting. I put the net in first, then I put in the weighting. The tube fills up with water and sinks to the bottom, so the net doesn't wrinkle and hangs down nicely under water so the fish always have enough room to swim. The cover net is put on, the screws are mounted so that they cannot damage the white netting.
If you now want to put a fish in, just slide the cover off a little. If you want to take out fish, just take the hole net out of the water. There is a nice gap between the covering net and the water surface which makes feeding through the net possible without problems. Of course you can also use a smaller mesh cover net. The relatively large size tubes keep everything safely on the surface. Overall i think my new floating net basket is very convenient, the young fish have plenty of space for swimming, they are protected from birds and I can feed and watch them while they swim in their usual water. Overall, I spent about 90 dollars for the materials. I hope that this video was helpful whish you good luck with your projects. Helpful comments are always appreciated. Take a look at my channel if you like, there are many pond and landscaping videos. Please do not forget to subscribe. See you soon, I'm Carl the Landscape guy.
First I am planning exactly how big the keep net will be and make a drawing. It is going to be 2.2 meters long, 1.2 meters wide and 0,8 meters deep. The drawing can now be used to . This drawing shows the net spread, it going to be made in one piece, that way I save some seams. I decided to use weatherproof fishnet mesh type PES300 with 3mm mesh width and ordered 10m² at netzeallerart.de
I designed the net the way that it can be sewn together in cuboid shape. It is easier to cut the mesh on level ground using the straight joints from the terrace for example. That way i get the rectangular angles easier. With tape measure, ruler and marker pen, the cuts are now transferred from the paper drawing onto the mesh. Since the mesh is to be cut the same way on both ends I fold it once, in order to be able to cut both ends simultaneously. Slipping can be prevented by fixation with needles. Then the slices are easily carried out with sharp scissors.
Now the net is sewn together according to the drawing to a cuboid.
The keep net will float on the water through pipes later. Therefore the net is flipped on the edges and sewn as a wide seam, so the float tube can later be simply inserted into the so formed tunnel. It is left open at one spot so that the pipe can be inserted.
As floating tubes I use PVC pipes 7,5 cm in diameter. These are stable, have an inconspicuous color, rubber seals on the connections and I can take it apart at any time again. I use 2m pieces for the long sides and 1m pieces for the short sides. Each corner is built from two 45° pipe elbows. I bought all pipes at the hardware store. All seals are treated with lubricant that way they can be pushed in easier and seal off better. The floating tube ring is left open at one point, so that I can slide on the sewn net. It works best to have someone helping to hold the pipes while you slide it on. Now it looks quite like a fish keep net already.
But I will add a removable cover net. This should keep the fish safe from predators like herons and cormorants and keep the fish from jumping out. To secure the net screws are placed in the pipes. The screws can be set at the crossing points, which gives additional stability. In between more screws are set centrally. Now the net can easily be put on. It is a stable Bird netting that is stretched with a threaded string.
I want to put some weight in the inside of the floating net basket to keep it hanging down. Therefore I got some thin cable pipes and elbows. I stuff some metal wire into the small pipes to make them heavy and cut them to the right length. Now I am gluing the pipes together with the elbows to a frame that fits the size of the net basket. I drill small holes into the pipes for the air to come out under water. Allow the glue to dry and done.
Now the fish keeping net can be set into the water. It now consists of three parts, the net with float tubes, the cover and the weighting. I put the net in first, then I put in the weighting. The tube fills up with water and sinks to the bottom, so the net doesn't wrinkle and hangs down nicely under water so the fish always have enough room to swim. The cover net is put on, the screws are mounted so that they cannot damage the white netting.
If you now want to put a fish in, just slide the cover off a little. If you want to take out fish, just take the hole net out of the water. There is a nice gap between the covering net and the water surface which makes feeding through the net possible without problems. Of course you can also use a smaller mesh cover net. The relatively large size tubes keep everything safely on the surface. Overall i think my new floating net basket is very convenient, the young fish have plenty of space for swimming, they are protected from birds and I can feed and watch them while they swim in their usual water. Overall, I spent about 90 dollars for the materials. I hope that this video was helpful whish you good luck with your projects. Helpful comments are always appreciated. Take a look at my channel if you like, there are many pond and landscaping videos. Please do not forget to subscribe. See you soon, I'm Carl the Landscape guy.
- Category
- Carp Fishing
Up Next
Autoplay
-
07:02

????Rangkaian dasaran 2 pancing anti boncos ||#fish #tutorial #knots
-
11:38
2.7 KG MRIGAL,CARP FISH, BIG FISH, RAHU, ROHU, CATLA, HYDERABAD FISH, FISH CATCHING, SPOON FISHING
-
09:48
Survival Skills: Build Camouflage Trap To Catch Fish - Catch A Lot Of Fish
-
10:03
Big Common carp & mirror carp Fish Farming | Carp fishing | Quality fishes select for Breeding
-
10:02
Survival Skills: Primitive Couple Build Fish Trap Catch Big Carp From Stone At River
-
Floating BEADS AND FLIES (MASSIVE FISH) Michigan Steelhead 2024 | JET BOAT
-
08:27
Rahu/Sura carp fish catching... successful fish bait feeder fishing #rahu fishing
-
05:31
Primitive Technology: Build Fishing Pool Model Balen Fish
-
04:25
How To Fish for TROUT with BOOBY Nymphs, Floating and Foam flies - BASICS!! by BK
-
11:12
FLOATING BEADS for Michigan Steelhead 2024- ( We Catch so many fish)
-
08:53
HATCH - BIG SKY PMDs - Montana Fly Fishing By Todd Moen
-
05:49
Fly Fishing In Some Of The Best Trout Fishing Water I Have Ever Seen!